
Unity Version Control: Master Git, GitKraken, and Automated Builds
Jan 20, 2026
Welcome to Local Space.
If you are new here, this is my recurring dev log. I spend my week building in Unity, figuring out how to make things work, and inevitably breaking them. Then, I share the notes, tools, and code snippets that actually survived the process.
In this log, we are tackling the most unsexy but critical part of game development: Version Control. We aren't just backing up files; we are creating a time machine, visualizing our project's history, and automating the "it works on my machine" problem away.
1. The Save System for Developers (Technical Deep Dive)
 |
 |
In games, we give players a Save Point before a boss fight. Version Control is that Save Point for developers.
But which Save System should you use? If you ask five developers, you'll get six answers. Here is the quick breakdown of the current landscape:
- Git (GitHub / GitLab): The industry standard for software. It is free, distributed, and has the largest ecosystem of tools.
Best for: Solo devs and small teams who want access to the best CI/CD pipelines (more on that later). - Perforce (Helix Core): The "AAA Standard." It uses a centralized server and "File Locking," which prevents artists from accidentally overwriting each other's work on the same binary file.
Best for: Large teams with many non-technical artists working on massive binary assets (4K textures, audio). - Unity Version Control (Plastic SCM): Unity's native solution. It tries to sit in the middle—easier than Perforce but better at handling large files than Git.
Best for: Teams who want an "all-in-Unity" workflow and don't want to touch the command line.
For Local Space, I stick with Git (specifically GitHub). Why? Because the ecosystem of automated tools is unbeatable.
Technical Deep Dive: If you choose Git, you must handle the "Binary Problem." Unity projects are folder-heavy. A common mistake beginners make is backing up everything. You don't need to version control the Library folder—Unity regenerates it. Including it bloats your repository by gigabytes and causes conflicts.
# .gitignore (The most important file in your repo)

# Unity generated folders - DO NOT COMMIT
/[Ll]ibrary/
/[Tt]emp/
/[Oo]bj/
/[Bb]uild/
/[Bb]uilds/
/[Ll]ogs/

# Visual Studio / IDE cache
.vs/
*.csproj
*.sln
By ignoring these, you ensure that only the Source (Assets, Packages, Settings) is tracked. This makes your project shareable and prevents the dreaded "Meta File Mismatch" errors when collaborating.
Download the official .gitignore here https://github.com/github/gitignore/blob/main/Unity.gitignore (for project more automation and management check out ORDO below)
2. Visualizing Complexity (Asset & Tool Spotlight)
Git is powerful, but the Command Line Interface (CLI) is terrifying for visual thinkers. If you mess up a merge in the terminal, it feels like defusing a bomb blindfolded.
The Tool Spotlight: This is why I use GitKraken. It is the best Git GUI for Unity developers, period.
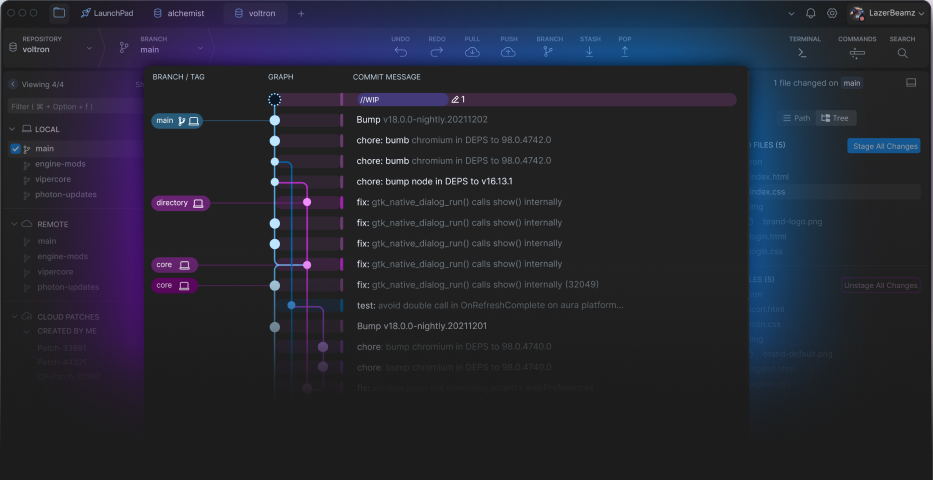
(image from gitkraken website)
GitKraken takes the abstract concept of "branches" and "commits" and turns them into a beautiful, multicolored subway map. You can literally drag one branch onto another to merge them. If there is a conflict (e.g., you and a teammate both edited the Player Prefab), GitKraken opens a visual diff tool to let you pick which version to keep.
💡 Visualizing LFS
Unity assets (textures, models) are heavy. GitKraken has native support for Git LFS (Large File Storage), meaning it handles your 4K textures automatically without choking your repository speed.
3. The Editor is a Simulation (Game Design Theory)
There is a dangerous trap in Unity development: The Editor is a Lie.
Your game runs at 600 FPS on your PC in the Editor. The touch controls work fine with your mouse. The shaders look perfect. Then you build to an Android phone, and it runs at 12 FPS, the UI is tiny, and the water shader is pink.
Game Design Theory: You cannot design "feel" in a vacuum. The only truth is the target device. Input lag, screen refresh rates, and thermal throttling change the user experience drastically. If you aren't testing on the device, you aren't testing the game; you're testing the simulation.
4. The "Push-to-Build" Hook (Business of Indie Dev)
Testing on a device is critical, but building for the device is boring. It takes 15 minutes to switch platforms, compile shaders, and build the APK. If you do this 4 times a day, you lose 5 hours a week.
The Solution: Continuous Integration (CI).
We can set up a "Hook"—specifically a GitHub Action or GitLab Pipeline—that listens for when you push code. When it detects a new commit, it spins up a cloud server, installs Unity, builds your game, and uploads the file for you.
To set this up, you create a YAML file in your repository (e.g., .github/workflows/main.yml). It looks something like this:
name: Build Project
on: [push]

jobs:
  buildWindows:
    name: Build for Windows
    runs-on: ubuntu-latest

    steps:
      - name: Checkout code
        uses: actions/checkout@v4

      - name: Unity Builder
        uses: game-ci/unity-builder@v4
        env:
          UNITY_LICENSE: ${{ secrets.UNITY_LICENSE }}
        with:
          targetPlatform: StandaloneWindows64
This might look intimidating, but you only have to set it up once. For a complete walkthrough, I highly recommend the documentation at GameCI (Game.ci). They provide the open-source actions that make this possible.
- Manual Workflow: Stop coding -> Switch Platform -> Wait 20 mins -> Copy to phone -> Test.
- CI Workflow: Push code -> Keep coding -> Phone buzzes 20 mins later with new build ready to install.
// When you are ready
Here are 3 ways I can help you level up your game dev journey:
Local Space is a production of Faktory Studios.
© 2026 All rights reserved.
Join the Local Space Newsletter
Weekly Unity dev tips, tools, and short lessons to help you build faster and ship real projects.
We hate SPAM. We will never sell your information, for any reason.